This documentation is currently being moved to our new documentation site.
Please view or edit the documentation there, instead.
If you're looking for Fluid Project coordination, design, communication, etc, try the Fluid Project Wiki.
Tutorial - Full Page Preferences Editor
This tutorial has not yet been re-written to reflect the recent refactoring of the Preferences Framework. Stay tuned...
This tutorial applies to v1.4 of UI Options.
For earlier versions, see
Tutorial - UI Options and UI Enhancer.
The Full Page version of UI Options displays the interface controls in a separate page. This tutorial will walk you through the process of setting up the full page version of UI Options.
NOTE that the UI Options component is pretty much useless without the UI Enhancer added to the pages of your site, so we highly recommend you visit the UI Enhancer tutorial to learn how to add the UI Enhancer to the pages of your site.
This tutorial assumes that:
- you are already familiar with HTML, Javascript and CSS,
- you are familiar with what the UI Options and UI Enhancer are and do, and
- now you just want to know how to add them to your application.
See Also
Tutorial - Page Enhancer
Tutorial - Full Page Preferences Editor (with Preview)
Tutorial - User Interface Options
Working With A Preferences Editor On Your Site
UI Options Instructional Demos
Full Page UI Options
Scenario
You're putting together a website that you know will have a diverse audience. You'd like to allow your visitors to customize the presentation of the site to their individual needs, such as enlarging the text, or increasing the visual contrast. This tutorial will show you how create a page for the Infusion UI Options component.
These are the basic steps to create a UI Options page for your site:
The rest of this tutorial will explain each of these steps in detail.
Step 1: Prepare your page
The UI Options component includes templates for its user interface, so you do not need to actually create any HTML if you're happy with the defaults. For the full-page version of UI Options, all you need to do is create an HTML page that has:
- one identifiable
<div>where the UI Options markup will be inserted - a
<div>where the Table of Contents will be displayed (UI Options allows users to request a table of contents be displayed on each page; see the UI Enhancer tutorial for more information about this).
You might also choose to add a heading to the page. This all might look as shown below:
<body>
    <!-- This div should be placed where the Table of Contents is to be displayed -->
    <div class="flc-toc-tocContainer"> </div>

    <h1>Customize Your Presentation Settings</h1>

    <!-- This is the div that will contain the UI Options component -->
    <div id="myUIOptions"> </div>

</body>
Note that we've put an ID on the <div>. This ID will be used to tell UI Options exactly which element to use as the main container for all of its markup. You can use any kind of CSS-based selector (e.g. a classname), so long as you are sure it will uniquely identify one and only one element.
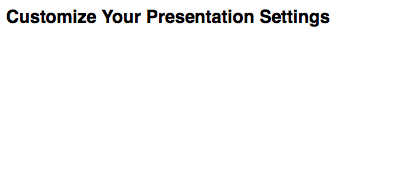
If you open this page in your browser, you'll only see the header, since UI Options isn't present on the page yet:
Step 2: Add dependencies to the page
UI Options depends upon Fluid Skinning System (FSS) and the Infusion Framework, so you will need to add to your pages dependencies for
- the FSS CSS files,
- the UI Options own CSS files, and
- the main Infusion JavaScript file,
infusion_custom.js.
In the header of your file, link to the FSS CSS files with <link> tags (you may have to adjust the paths to reflect where you've saved the Infusion package).
<!-- Required CSS files -->
<link rel="stylesheet" type="text/css" href="lib/infusion/framework/fss/css/fss-layout.css" />
<link rel="stylesheet" type="text/css" href="lib/infusion/framework/fss/css/fss-text.css" />
<link rel="stylesheet" type="text/css" href="lib/infusion/framework/preferences/css/fss/fss-theme-bw-prefsEditor.css" />
<link rel="stylesheet" type="text/css" href="lib/infusion/framework/preferences/css/fss/fss-theme-wb-prefsEditor.css" />
<link rel="stylesheet" type="text/css" href="lib/infusion/framework/preferences/css/fss/fss-theme-by-prefsEditor.css" />
<link rel="stylesheet" type="text/css" href="lib/infusion/framework/preferences/css/fss/fss-theme-yb-prefsEditor.css" />
<link rel="stylesheet" type="text/css" href="lib/infusion/framework/preferences/css/fss/fss-theme-lgdg-prefsEditor.css" />
<link rel="stylesheet" type="text/css" href="lib/infusion/framework/preferences/css/fss/fss-theme-dglg-prefsEditor.css" />
<link rel="stylesheet" type="text/css" href="lib/infusion/framework/preferences/css/fss/fss-text-prefsEditor.css" />
<link rel="stylesheet" type="text/css" href="lib/infusion/lib/jquery/ui/css/fl-theme-by/by.css" />
<link rel="stylesheet" type="text/css" href="lib/infusion/lib/jquery/ui/css/fl-theme-yb/yb.css" />
<link rel="stylesheet" type="text/css" href="lib/infusion/lib/jquery/ui/css/fl-theme-bw/bw.css" />
<link rel="stylesheet" type="text/css" href="lib/infusion/lib/jquery/ui/css/fl-theme-wb/wb.css" />
<link rel="stylesheet" type="text/css" href="lib/infusion/lib/jquery/ui/css/fl-theme-lgdg/lgdg.css" />
<link rel="stylesheet" type="text/css" href="lib/infusion/lib/jquery/ui/css/fl-theme-dglg/dglg.css" />
- Note: The theme "dark-grey on light-grey" is planned for a future release. Therefore css/fl-theme-dglg/dglg.css is currently optional.
You'll also need the UI Options CSS files specific to the Full Page UI Options:
<link rel="stylesheet" type="text/css" href="components/uiOptions/css/UIOptions.css" />
<link rel="stylesheet" type="text/css" href="components/uiOptions/css/FullUIOptions.css" />
<link rel="stylesheet" type="text/css" href="components/uiOptions/css/FullNoPreviewUIOptions.css" />
We'll use the <script> tag to link to the Infusion library:
<!-- The Infusion Library -->
<script type="text/javascript" src="lib/infusion/infusion-custom.js"></script>
Note that the infusion-custom.js file is a concatenation of all of the required JavaScript files and will be minified (i.e. all of the whitespace removed) if you've built the minified version. If so, it might be difficult to debug with. If you want to be able to debug the code, you might want to choose the "source" version when you create your Infusion bundle.
Step 3: Write a script to create the UI Options component
The simplest way to add the UI Options component to your page is using a <script> tag near the top of the page. We suggest placing it right before the UI Options markup created in Step 1.
<body>
    <script type="text/javascript">
        // All of our code will go here
    </script>

    <!-- UI Options mark-up here -->

    <!-- the rest of your page here -->
</body>
Finally, we instantiate the UI Options component itself. We do this by calling the creator function, which takes two arguments:
- the selector of the container for the component, and
- an options object for configuring the component.
The selector for our UI Options will be the ID of the <div> we created in Step 1.
We will use the options to tell the component about two things:
- where it's living in relation to the HTML templates included in Infusion: the
prefixoption - where to redirect when the Cancel button is pressed: an
onCancellistener in theuiOptionssubcomponent
<script type="text/javascript">
    // Instantiate the UI Enhancer component, specifying the table of contents' template URL
    fluid.pageEnhancer({
        tocTemplate: "<path to your copy of Infusion>/components/tableOfContents/html/TableOfContents.html"
    });

    // Instantiate the UI Options component
    fluid.uiOptions.fullNoPreview("#myUIOptions", {
        // Tell UIOptions where to find all the templates, relative to this file
        prefix: "<path to your copy of Infusion>/components/uiOptions/html/",

        // Tell UIOptions where to redirect to if the user cancels the operation
        uiOptions: {
            options: {
                listeners: {
                    onCancel: function(){
                        window.location = "<the URL of the page to return to>";
                    }
                }
            }
        }
    });
</script>
Now, when you load your page in your browser, you will see the UI Options controls:
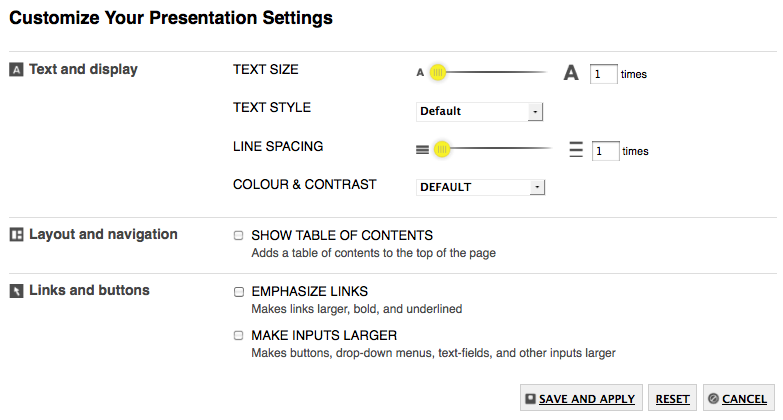
Congratulations!
UI Options is now fully functional on your page. If you adjust the controls and click "Save and Apply," your changes will be applied to the page. If you've also added the UI Enhancer to the other pages of your site, those pages will also be transformed.
One last thing!
Don't forget to add a link to the the UI Options page to your site – somewhere easy-to-find, such as your site's header or footer.