Tutorial - Simple Text Inline Edit
This page will walk you through an example of adding the Fluid Inline Edit component to an HTML file. For more general information about the Inline Edit API, see Simple Text Inline Edit API.
This tutorial assumes that:
- you are already familiar with HTML, Javascript and CSS
- you are familiar with what the Inline Edit is and does
- now you just want to know how to add it to your file.
Tutorial: How to Use the Inline Edit
Scenario
You've created a database to keep track of your vast collection of CDs, and you're working on a web interface for it. You'd like to be able to very easily edit the information on the page. This tutorial will show you how to use the Fluid Inline Edit for this.
There are four basic steps to adding the Inline Edit to your application:
- Setup: Download and install the Fluid Infusion library
- Step 1: Prepare your markup
- Step 2: Write the script
- Step 3: Add the Infusion library to your HTML
- Step 4: Apply styles
The rest of this tutorial will explain each of these steps in detail.
This component is in Production status
Join the infusion-users mailing list and ask your questions there.
Setup: Download and install the Fluid Infusion library
- Download a copy of the Fluid Infusion component library from:
- http://fluidproject.org/products/fluid-infusion/download-infusion/
You only really need the "Minified deployment package," but if you want to actually look at the code, you should download the "Source package."
- http://fluidproject.org/products/fluid-infusion/download-infusion/
- Unpack the zip file you just downloaded, and place the resulting folder somewhere convenient for your development purposes.
The folder will have the release number in its name (e.g. infusion-1.4/). The rest of this tutorial will use infusion-1.4 in its examples, but if you downloaded a different version, you'll have to adjust.
Step 1: Prepare your markup
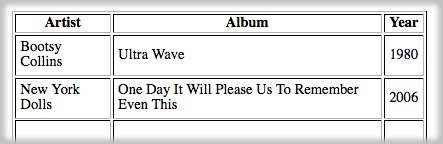
Let's assume that you're working with some HTML that displays the information about your collection - something simple like this:
<table>
  <tr>
    <th>Artist</th>
    <th>Album</th>
    <th>Year</th>
  </tr>
  <tr>
    <td>Bootsy Collins</td>
    <td>Ultra Wave</td>
    <td>1980</td>
  </tr>
  <tr>
    <td>New York Dolls</td>
    <td>One Day It Will Please Us To Remember Even This</td>
    <td>2006</td>
  </tr>
  ...
</table>
In a browser window, this might look something like this:
The Changes
The simplest way to make many pieces of text editable requires you to do three things:
- mark the elements you want to be editable with the default CSS selector class, "
flc-inlineEditable" - wrap the actual editable text with an element * with a CSS class of "
flc-inlineEdit-text" - tell the Inline Edit about the container of these elements.
If we want to make, say, all of the album titles editable, then we could
- add the "
flc-inlineEditable" class to those<td>elements - wrap the text in those
<td>elements in a<span>* with thetextclass - place a unique ID on the
<table>element.
This might look like the HTML sample to the right.
<table id="catalog-table">
  <tr>
    <th>Artist</th>
    <th>Album</th>
    <th>Year</th>
  </tr>
  <tr>
    <td>Bootsy Collins</td>
    <td class="flc-inlineEditable">
      <span class="flc-inlineEdit-text">Ultra Wave</span>
    </td>
    <td>1980</td>
  </tr>
  <tr>
    <td>New York Dolls</td>
    <td class="flc-inlineEditable">
      <span class="flc-inlineEdit-text">One Day It Will Please Us
                         To Remember Even This</span>
    </td>
    <td>2006</td>
  </tr>
  ...
</table>
That's all - these are the only changes you need to make to your HTML.
* The editable text needs to be wrapped in its own element because this element will be hidden, and replaced with an edit field, when the text is edited. If, in your HTML, you already have an element wrapping your text (for example a <p> or a <div>), you could simply add the flc-inlineEdit-text class to that. In this example, we can't add the class to the <td> elements because you can't just hide a table cell and replace it with an edit field, can you? That wouldn't leave you with a valid table.
Step 2: Write the script
The script needed to instantiate the Inline Edit components will look like this:
jQuery(document).ready(function () {
    fluid.inlineEdits("#catalog-table");
});
This function will look inside the element with the "catalog-table" ID (in this case, your <table> element) for anything with the flc-inlineEditable class, and convert everything it finds into an Inline Edit field.
By putting the initialization function inside the jQuery(document).ready() call, you ensure that all of your markup is ready before you try to initialize the Inline Edit components.
This script can be placed in a <script> block at the end of your document.
Step 3: Add the Infusion library to your HTML
You'll need to add the Fluid library to you HTML file. In the header of the file, link to the Javascript files with <script> tags:
<script type="text/javascript" src="infusion-1.2/InfusionAll.js"></script>
NOTE that the InfusionAll.js file is minified - all of the whitespace has been removed, so it isn't really human-readable. If you're using the source distribution and you want to be able to debug the code, you'll want to include each of the required files individually. This would look like this:
<script type="text/javascript" src="lib/jquery/core/js/jquery.js"></script>
<script type="text/javascript" src="lib/jquery/ui/js/jquery.ui.core.js"></script>
<script type="text/javascript" src="lib/jquery/ui/js/jquery.ui.widget.js"></script>  <!-- New in v1.3 -->
<script type="text/javascript" src="lib/jquery/ui/js/jquery.ui.position.js"></script>  <!-- New in v1.3 -->
<script type="text/javascript" src="lib/jquery/plugins/tooltip/js/jquery.tooltip.js"></script>
<script type="text/javascript" src="framework/core/js/FluidDocument.js"></script>  <!-- New in v1.3 -->
<script type="text/javascript" src="framework/core/js/jquery.keyboard-a11y.js"></script>
<script type="text/javascript" src="framework/core/js/Fluid.js"></script>
<script type="text/javascript" src="framework/core/js/DataBinding.js"></script>  <!-- New in v1.4 -->
<script type="text/javascript" src="components/tooltip/js/Tooltip.js"></script>  <!-- New in v1.3 -->
<script type="text/javascript" src="components/inlineEdit/js/InlineEdit.js"></script>
But all of these individual files are not necessary to make it work - the InfusionAll.js file has everything you need.
So that's it! That's all you need to do to add the Inline Edit functionality to your table cells.
BUT: If you look at the file in a browser now, it doesn't look any different than it looked before - there's no way to tell that the album titles are editable. That's what the styles are for.
Step 4: Apply styles
The Inline Edit component can be skinned "out of the box" by including the component's CSS file:
<link rel="stylesheet" type="text/css" href="components/inlineEdit/css/InlineEdit.css" />
If you wish to define your own styles instead, use the following information:
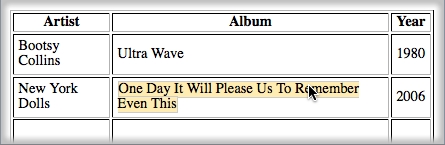
The Inline Edit adds classes to the display text element that can be used to style the element to let users know that the text is editable - that is, to make the functionality 'discoverable.' These classes are applied at various 'interesting moments,' for example when the cursor hovers over the editable text, or when Tab key is used to move focus to the text.
Important note
The visual appearance of the styles in the example below are just that: examples. You are free to create whatever styles you like. The important thing to understand is
- what the interesting moments are, and
- what the names of the styles for those moments are
Some of the styles that are applied by the Inline Edit, and the 'interesting moments' they are used for, are described below. For detailed information on all of the styles, see the Simple Text Inline Edit API page.
Style name: "invitation"
Default class: "fl-inlineEdit-invitation"
When: mouse hover and keyboard focus
Why: so that users can know that the text is editable
Sample style:
.fl-inlineEdit-invitation {
   background-color: #FFECB3 !important;
   border: 1px solid #CCC !important;
}
Style name: "focus"
Default class: "fl-inlineEdit-focus"
When: keyboard focus on the text
Why: so that users know that focus is on the text, and that they can press Enter to start editing
Sample style:
.fl-inlineEdit-focus {
    border: 2px solid #777777;
}
If we add a stylesheet with these styles, the table will look like this when the mouse hovers over the album titles: