How to Create a Fluid Component
This tutorial is based on Infusion v1.1, and is, hence, a bit out of date. It will be deprecated soon. For more up-to-date information, try Creating a Component.
This tutorial will walk you through the creation of a Fluid Component called Flutter, a simple Twitter client. This tutorial is not intended to provide in depth information into what Flutter is or how it works, but to give an understanding of the process of creating a component in general. In order to complete this tutorial, it is assumed that you know and understand HTML, CSS, and JS.
These are the basic tutorial steps:
- Set up your environment
- Step 1: Learn about the parts of Fluid components
- Step 2: Learn about and create a creator function
- Step 3: Learn about and create a fluid.default function
- Step 4: Learn about and create a subcomponent
The rest of this tutorial will explain each of these steps in detail.
Set Up Your Environment
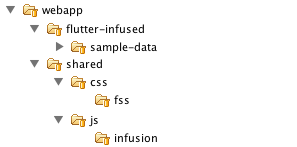
Create a directory structure
For this tutorial, create the following directory layout in your favourite development environment. We use Aptana.
|
Click below to enlarge |
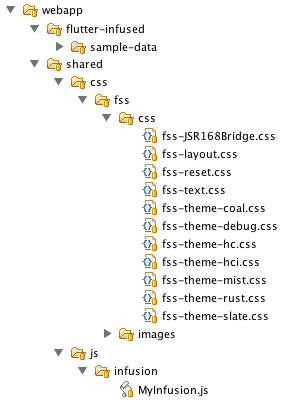
Add Fluid Infusion dependencies
|
Click below to enlarge |
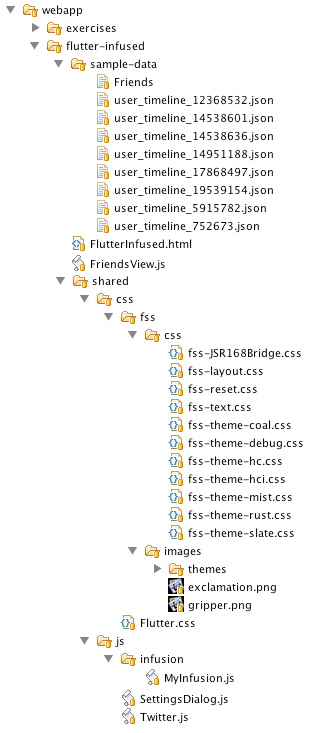
Add Flutter dependencies
Copy the files below into the appropriate directories.
File |
Directory |
|---|---|
webapp/shared/css |
|
webapp/shared/js |
|
webapp/shared/js |
|
webapp/flutter-infused |
|
webapp/flutter-infused |
|
webapp/flutter-infused/sample-data |
|
webapp/flutter-infused/sample-data |
|
webapp/flutter-infused/sample-data |
|
webapp/flutter-infused/sample-data |
|
webapp/flutter-infused/sample-data |
|
webapp/flutter-infused/sample-data |
|
webapp/flutter-infused/sample-data |
|
webapp/flutter-infused/sample-data |
|
webapp/flutter-infused/sample-data |
The result should look something like the image below (click to enlarge). |
Join the infusion-users mailing list and ask your questions there.
Parts of a Fluid Component
A Fluid Component is made up of three main parts: a creator function, fluid.defaults, and helper functions.
The creator function is used to create a component. It is not a constructor, and does not use the "new" keyword. Public functions can be included inside the creator function.
fluid.defaults is where all of the default options for a component are specified. The Fluid Framework manages the component's options. It makes it easier to find selectors in the DOM, handle programmatically changed styles, and reference all of the options.
The helper functions are the private functions that a component uses, and does not expose. These are optional and will not be discussed in this tutorial.
The Creator Function
The creator function is not a constructor and does not make use of the "new" keyword. Rather, it replaces the need for a constructor and allows the ability to separate public and private methods.
The code for the creator function is marked in the code below.
(function (nameSpace) {

    var privateFunc = function () { some private function };

    //start of creator function
    nameSpace.componentName = function (container, options) {
        var that = fluid.initView("nameSpace.componentName ", container, options);

        that.refreshView() {
            some refresh function
        }

        return that;
    };
    //end of creator function

})(nameSpace);
Let's look at this in more detail.
Anonymous functions
By wrapping all of the javascript for the component inside an anonymous function, we can separate private and public methods. The anonymous function is accomplished with the code below.
(function () {

// place javascript here

})()
The creator function signature
The next step is to prepare the creator function for the component. Its signature is defined by giving the function a name and assigning it to a function with the parameters (container, options).
- componentName is the name of the component you are creating.
- container is a "jQueriable" element (a string representing a selector, a DOM element, or a jQuery) which will contain the component.
- options is a JavaScript object specifying the configuration details of the component
The result is shown below.
(function (nameSpace) {

    nameSpace.componentName = function (container, options) {};

})(nameSpace)
Read more about the creator function:
initView
To make componentName an actual component, the first task within the creator is to create a new object called that, which is assigned the value of fluid.initView(componentName, container, options).
(function (nameSpace) {

    nameSpace.componentName = function (container, options) {
        var that = fluid.initView("nameSpace.componentName", container, options);

        return that; //should always be the last line of the creator function
    };

})(nameSpace)
Read more about the creator function and initView:
More detailed information about the initView function can be found here.
Public functions
To add public functions to the component, you can define a function within the scope of the creator function and add it to the that object. For example if we wanted to add a refreshView function to the component, the code would look like...
(function (nameSpace) {

    nameSpace.componentName = function (container, options) {
        var that = fluid.initView("nameSpace.componentName", container, options);

        that.refreshView() = function { some refresh function };

        return that;
    };

})(nameSpace)
To call this function you use:
nameSpace.componentName.refreshView();
Private functions
Functions defined within the anonymous function but outside the creator function and without having the nameSpace prefix, will be private and inaccessible to the global namespace. Thus, a private function can be defined as shown below.
(function (nameSpace) {

    var privateFunc = function () { some private function };

    nameSpace.componentName = function (container, options) {
        var that = fluid.initView("nameSpace.componentName", container, options);

        that.refreshView() = function { some refresh function };

        return that;

    };

})(nameSpace)
Read more about private functions:
Writing a creator function for Flutter
Try writing a creator function for Flutter's status view. Download the fluid:Sample Code. Rename the file to StatusView.js and place into the "flutter-infused" directory. The following tutorial code for the creator function should be added starting at line 41 (see comments within the code).
Flutter's views take two extra arguments which are not usually required for Fluid components, however Fluid components are flexible and can accommodate additional arguments. These two arguments, "twitter" and "events", are added to the statusView creator function as shown below.
    /**
     * A View representing the Flutter status panel.
     *
     * @param {Object} container
     * @param {Object} options
     */
    fluid.flutter.statusView = function (container, twitter, events, options) {

    };
Next call initView
    /**
     * A View representing the Flutter status panel.
     *
     * @param {Object} container
     * @param {Object} options
     */
    fluid.flutter.statusView = function (container, twitter, events, options) {
        var that = fluid.initView("fluid.flutter.statusView", container, options);
        that.twitter = twitter;
        that.events = events;
    };
Now add the public methods and any other function that the creator function needs to call.
    /**
     * A View representing the Flutter status panel.
     *
     * @param {Object} container
     * @param {Object} options
     */
    fluid.flutter.statusView = function (container, twitter, events, options) {
        var that = fluid.initView("fluid.flutter.statusView", container, options);
        that.twitter = twitter;
        that.events = events;

        /**
         * Updates the user's status on Twitter.
         *
         * @param {String} statusMessage the status message to send to Twitter
         */
        that.updateStatus = function (statusMessage) {
            // Post the status to the server
            that.twitter.postStatus(statusMessage,
                                    that.events.onStatusSaveSuccess.fire,
                                    that.events.onStatusSaveError.fire);
        };

        /**
         * Shows a message to the user when their status has been successfully updated on Twitter.
         */
        that.showStatusUpdateSuccess = function () {
            showStatusUpdateMessage(that, "Your status was successfully updated!");

            // Clear the edit field so the user has another affordance showing that their status update was a success.
            that.locate("statusEdit").val("");
        };

        /**
         * Displays a polite error message to the user if there was a problem updating their status on Twitter.
         */
        that.showStatusUpdateError = function () {
            showStatusUpdateMessage(that, "There was a problem updating your status on Twitter.");
        };

        setupStatusView(that);
        return that;
    };
When you are done, the code should look like this - fluid:Complete Code
To summarize, the following code is a fluid:basic template for a fluid component.
/*
 Insert license here
*/

/*global jQuery*/
/*global fluid_1_1*/

fluid_1_1 = fluid_1_1 || {}; //use current released version number

(function($, fluid) {

    var privateFunc = function() {

        // some private function

    };

    //see http://wiki.fluidproject.org/display/fluid/The+creator+function
    //start of creator function

    nameSpace.componentName = function(container, options) {
        var that = fluid.initView("nameSpace.componentName ", container, options);

        that.publicFunc = function() {

            // some public function

        };

        return that;
    };

    //end of creator function

    //start of defaults

    fluid.defaults("componentName", {

	//default options can be selectors, styles, strings, or events
	//also can create options based on subcomponents using subComponentName as the optionName
	//finally, custom options are also possible
	//see http://wiki.fluidproject.org/display/fluid/fluid.defaults

        option1Name: {
            key: value
        },
        option2Name: {
            key1: value1,
            key2: value2
        }

    });

    // end of defaults

})(jQuery, fluid_1_1);


