The rest of this tutorial will explain each of these steps in detail. | Include Page |
|---|
| _tutorial setup |
|---|
| _tutorial setup |
|---|
|
Step 1: Add dependencies to the pagesUI Enhancer depends upon Fluid Skinning System (FSS) and the Infusion Framework, so you will need to add to your pages dependencies for - the FSS CSS files
- the main Infusion JavaScript file,
MyInfusion.js.
In the header of the file, link to the CSS files with <link> tags and the JavaScript file with a <script> tag (you'll likely have to adjust the paths to reflect where you've saved the Infusion package): | Code Block |
|---|
|
<!-- Required CSS files -->
<link rel="stylesheet" type="text/css" href="framework/fss/css/fss-layout.css" />
<link rel="stylesheet" type="text/css" href="framework/fss/css/fss-text.css" />
<link rel="stylesheet" type="text/css" href="framework/fss/css/fss-theme-hc-uio.css" />
<link rel="stylesheet" type="text/css" href="framework/fss/css/fss-theme-hci-uio.css" />
<link rel="stylesheet" type="text/css" href="framework/fss/css/fss-theme-blackYellow-uio.css" />
<link rel="stylesheet" type="text/css" href="framework/fss/css/fss-theme-yellowBlack-uio.css" />

<!-- The Infusion Library -->
<script type="text/javascript" src="MyInfusion.js"></script>
|
Note that the MyInfusion.js file is a concatenation of the selected Infusion files, and will be minified (all of the whitespace removed) if you've selected the minified version, so it might be difficult to debug with. If you're using the source distribution and you want to be able to debug the code, you might want to include each of the required files individually. To do this: Instead of including MyInfusion.js you would include the following files: | Code Block |
|---|
|
<script type="text/javascript" src="lib/jquery/core/js/jquery.js"></script>

<script type="text/javascript" src="framework/core/js/Fluid.js"></script>
<script type="text/javascript" src="framework/core/js/FluidRequests.js"></script>
<script type="text/javascript" src="framework/core/js/DataBinding.js"></script>
<script type="text/javascript" src="framework/core/js/FluidIoC.js"></script>
<script type="text/javascript" src="lib/fastXmlPull/js/fastXmlPull.js"></script>
<script type="text/javascript" src="framework/renderer/js/fluidParser.js"></script>
<script type="text/javascript" src="framework/renderer/js/fluidRenderer.js"></script>
<script type="text/javascript" src="framework/renderer/js/RendererUtilities.js"></script>

<script type="text/javascript" src="components/uiOptions/js/Store.js"></script>
<script type="text/javascript" src="components/uiOptions/js/UIEnhancer.js"></script>
<script type="text/javascript" src="components/tableOfContents/js/TableOfContents.js"></script>
|
But remember that all of these individual files are not necessary to make it work - the MyInfusion.js file has everything you need. Step 2: Prepare your pages for theming| Wiki Markup |
|---|
{div:class=floatRight}
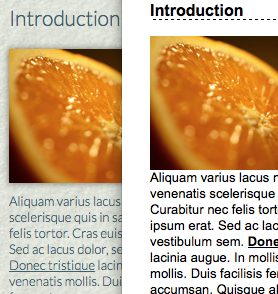
!high-contrast.png|border=1px, alt="side-by-side comparison of a page with default styles and high-contrast styles"!
{div}| Div |
|---|
|  Image Added Image Added
|
Some of the transformations that your site visitors might want require the UI Enhancer to apply a theme to your site (for example, a high-contrast theme that will make your site easier to read for people with certain visual impairments). For this to work properly, you need to scope your site's default colour-related styles to a theme, so that the UI Enhancer can properly "swap" colour themes. Scoping your styles to a theme is easy: - choose a CSS class name that will be unique,
- define all of your colour-related styles (including background images on the page) to be constrained by that theme name, and
- add the class to the body of your pages.
For this demo, we'll use the theme name "uio-demo-theme." All of the selectors for our styles will be scoped to this name, for example: | Code Block |
|---|
.uio-demo-theme {
    color: #3E606F;
    background-image: url("../images/background_texture.png");
    background-position: left top;
    background-repeat: repeat;
}
.uio-demo-theme a {
    color: #3E606F;
}
.uio-demo-theme .feedback-form input,
.uio-demo-theme .feedback-form textarea {
    color: grey;
}
|
Finally, we apply this class name to the body of our pages: | Code Block |
|---|
|
<body class="uio-demo-theme">
    ...
</body>
|
To switch themes, the UI Enhancer will replace your theme name with the user's choice of theme, and will restore your theme name if the preference is reset. Step 3: Prepare your pages for a Table of Contents| Wiki Markup |
|---|
{div:class=floatRight}
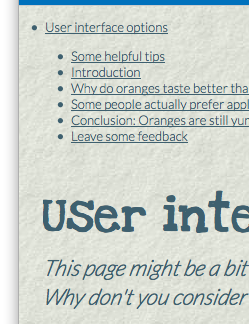
!toc.png|alt="the corner of a page that has a table of contents added to the top"!
{div}| Div |
|---|
|  Image Added Image Added
|
One of the transformations your site visitors may request is the addition of a Table of Contents for the page. To prepare your pages for this, you need to add a single identifiable empty <div> in the location where the Table of Contents should appear. The easiest way to identifying the Table of Contents <div> is using the default classname: flc-toc-tocContainer. In your page, this will look like the following: | Code Block |
|---|
|
<body class="uio-demo-theme">
    <div class="flc-toc-tocContainer"> </div>
    ...
</body>
|
You may choose a different classname or an ID, but you will need to specify this in your script. Step 4: Write the script to add the UI EnhancerNow that your pages are ready, the final step is to actually add the UI Enhancer to the page. The simplest way to do this is using a <script> tag near the top of the page. We suggest placing it right after the markup added in Step 3. | Code Block |
|---|
|
<body class="uio-demo-theme">
    <div class="flc-toc-tocContainer"> </div>

    <script type="text/javascript">
        // All of our code will go here
    </script>
    ...
</body>
|
We'll create the UI Enhancer component using the fluid.pageEnhancer() function, which applies the UI Enhancer to the entire page. We'll need to tell the page enhancer two things: - the name of our default theme, as created in Step 2, and
- the path to the Table of Contents HTML template, which will be used to render the table of contents.
| Code Block |
|---|
|
<script type="text/javascript">
    fluid.pageEnhancer({

        // Specify the default theme class name
        classnameMap: {
            theme: {
                "default": "uio-demo-theme"
            }
        },

        // Specify the table of contents' template URL
        tocTemplate: "<path to your version of Infusion>/components/tableOfContents/html/TableOfContents.html"
    });
</script>
|
| Panel |
|---|
| Congratulations!
The UI Enhancer is now fully functional on your pages. That's all you have to do. |
Of course, unless your visitors are able to specify what their preferences are, the UI Enhancer has nothing to do, so your next task is to provide your visitors with the UI Options interface. There are three versions to choose from.You can find demonstrations of these three versions in the demo Portal on our build site  . . Pick the tutorial that goes with your choice: | 

