Pager Tutorial - Markup-driven
Full Renderer support has been added to the Pager, providing a data-driven mode – this is the recommended way of using the Pager. For a tutorial describing how to use the data-driven Pager, see Pager Tutorial. This tutorial describes a more complex scenario where you supply your own markup to the Pager.
This page will walk you through an example of adding the Fluid Pager component to an HTML file.
This tutorial assumes that:
- you are already familiar with HTML, Javascript and CSS
- you are familiar with what the Pager is and does
- now you just want to know how to add it to your file.
For more general information about the Pager, see Pager. For technical API documentation, see Pager API.
Tutorial: How to Use the Pager
Scenario
You've created a database to keep track of your vast collection of CDs, and you're working on a web interface for it. You'd like to break up long listings of search results into shorter, more managable chunks. This tutorial will show you how to use the Fluid Pager for this.
There are four basic steps to adding the Pager to your application:
- Setup: Download and install the Fluid Infusion library
- Step 1: Prepare your markup
- Step 2: Write the script
- Step 3: Add the script to your HTML
- Step 4: Apply styles
The rest of this tutorial will explain each of these steps in detail.
This component is in Preview status
Join the infusion-users mailing list and ask your questions there.
Setup: Download and install the Fluid Infusion library
- Download a copy of the Fluid Infusion component library from:
- http://fluidproject.org/products/fluid-infusion/download-infusion/
You only really need the "Minified deployment package," but if you want to actually look at the code, you should download the "Source package."
- http://fluidproject.org/products/fluid-infusion/download-infusion/
- Unpack the zip file you just downloaded, and place the resulting folder somewhere convenient for your development purposes.
The folder will have the release number in its name (e.g. infusion-1.4/). The rest of this tutorial will use infusion-1.4 in its examples, but if you downloaded a different version, you'll have to adjust.
Step 1: Prepare your markup
This tutorial shows how to use the Pager in an entirely mark-up driven approach. This means that you will provide all the markup yourself instead of having the Pager generate it.
The Pager requires certain minimum markup from you:
- The entire pager must be contained within a container element.
- Within that container, there are one or two 'pager bar' elements, each containing:
- any number of page links
- optionally, a 'next' element and a 'previous' element
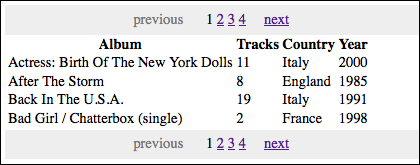
So, with some styles, you might want something that looks like this:
Note that the image on the left is just an example. You could just as easily want a simple markup and styles that look like this:
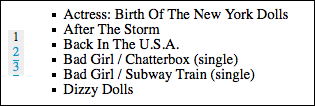
The point is that your markup has the required elements.
Let's assume that you're starting with HTML file that produces something like the image above (but simplified, so that this tutorial doesn't get too verbose):
<ul>
<li><a href="#">< previous</a></li>
<li><a href="#">1</a></li>
<li><a href="#">2</a></li>
<li><a href="#">3</a></li>
<li><a href="#">next ></a></li>
</ul>
<table>
<tr>
<th>Album</th>
<th>Tracks</th>
<th>Country</th>
<th>Year</th>
</tr>
<tr>
<td>Actress: Birth Of The New York Dolls</td>
<td>11</td>
<td>Italy</td>
<td>2000</td>
</tr>
<tr>
<td>After The Storm</td>
<td>8</td>
<td>England</td>
<td>1985</td>
</tr>
<tr>
<td>Back In The U.S.A.</td>
<td>19</td>
<td>Italy</td>
<td>1991</td>
</tr>
</table>
<ul>
<li><a href="#">< previous</a></li>
<li><a href="#">1</a></li>
<li><a href="#">2</a></li>
<li><a href="#">3</a></li>
<li><a href="#">next ></a></li>
</ul>
The Pager component needs to know about the 'container' of your markup. We'll wrap a <div> around the whole thing, and give it a unique ID:
<div id="my-pager">
<ul>
<li><a href="#">< previous</a></li>
<li><a href="#">1</a></li>
<li><a href="#">2</a></li>
...
</div>
We also need to identify the various parts to the Pager. We'll do this by attaching the default CSS class names that the Pager will recognize.
The Pager recognizes several default class names:
flc-pager-topfor the container of the link bar above the contentflc-pager-bottomfor the container of the link bar below the contentflc-pager-pageLinkfor any link inside a link barflc-pager-nextfor the 'next' linkflc-pager-previousfor the 'previous' link
We'll consider the <ul> elements to be the containers for the top and bottom link bars, and the <li> elements themselves to be the links:
<div id="my-pager">
<ul class="flc-pager-top">
<li class="flc-pager-previous"><a href="#">< previous</a></li>
<li class="flc-pager-pageLink"><a href="#">1</a></li>
<li class="flc-pager-pageLink"><a href="#">2</a></li>
<li class="flc-pager-pageLink"><a href="#">3</a></li>
<li class="flc-pager-next"><a href="#">next ></a></li>
</ul>
...
<ul class="flc-pager-bottom">
<li class="flc-pager-previous"><a href="#">< previous</a></li>
<li class="flc-pager-pageLink"><a href="#">1</a></li>
<li class="flc-pager-pageLink"><a href="#">2</a></li>
<li class="flc-pager-pageLink"><a href="#">3</a></li>
<li class="flc-pager-next"><a href="#">next ></a></li>
</ul>
</div>
You may have noticed that we haven't touched the <table> elements between the top and bottom link bars. That's because when used in a markup driven way, the Pager honestly couldn't care what you've got in there. The Pager is only concerned with the link bars, and what happens when you click on those links. And in fact, the Pager doesn't really care what you do when the links are clicked - it simply tells you which link was activated and hands control over to you to act accordingly. More on that soon, but for now, we need to be able to know which link was activated. We'll do this by adding a 'value' to each numbered <li> element:
<div id="my-pager">
<ul id="pager-top" class="flc-pager-top">
<li class="flc-pager-previous"><a href="#">< previous</a></li>
<li value="1" class="flc-pager-pageLink"><a href="#">1</a></li>
<li value="2" class="flc-pager-pageLink"><a href="#">2</a></li>
<li value="3" class="flc-pager-pageLink"><a href="#">3</a></li>
<li class="flc-pager-next"><a href="#">next ></a></li>
</ul>
...
<ul id="pager-bottom" class="flc-pager-bottom">
<li class="flc-pager-previous"><a href="#">< previous</a></li>
<li value="1" class="flc-pager-pageLink"><a href="#">1</a></li>
<li value="2" class="flc-pager-pageLink"><a href="#">2</a></li>
<li value="3" class="flc-pager-pageLink"><a href="#">3</a></li>
<li class="flc-pager-next"><a href="#">next ></a></li>
</ul>
</div>
That's all - these are the only changes you need to make to your HTML.
Step 2: Write the script
You'll need to create a file, say search-results.js, to contain your initialization script - the script you write to apply the Pager to your search results mark-up.
In this file, write a function that initializes the Pager:
var demo = demo || {};

(function ($, fluid) {
    demo.initPager = function () {
        fluid.pager("#my-pager");
    };

})(jQuery, fluid);
This function creates the Pager component, with your <div> as the container.
At the bottom of your HTML file, you will call this initialization function in a <script> tag:
<script type="text/javascript">
    demo.initPager();
</script>
BUT: doing this alone is not sufficient. As mentioned above, the Pager is mark-up driven. As far as your script is concerned, this means that the Pager itself doesn't know what to do when a page link is clicked. All the Pager can do is call a function that you provide. You have to write that function.
The onModelChange Callback
Since the Pager doesn't actually know anything about your data, you have to take care of displaying the different pages of data yourself. The onModelChange function is used for this purpose.
The pageWillChange function is a function that you write and provide to the Pager, using the options parameter, as follow:
var myOnModelChangeFn = function (newModel, oldModel) {
    ...
};
var options = {
    listeners: {
       onModelChange: myOnModelChangeFn
     }
};
demo.initPager = function () {
    fluid.pager("#my-pager", options);
};
When a page link is activated, the Pager will call your function. It's up to you to write a function that will replace the content of the Pager with the correct page of data. How you do that is entirely up to your application, and the nature of your data. The newModel structure which you are passed describes the pager's model, which means its current paging state - for this example, all you are interested in is the member named pageIndex which is the 0-based index of the page the user has just selected. More details on the Pager's model and general API is at Pager API.
In the scenario of this tutorial, you're creating a web front-end for your CD library, and using the Pager to chunk up search results. In this case, you would have to write a function that accepts the page number and in response, updates the page display with the relevant list of CDs from your search results.
Step 3: Add the script to your HTML
You'll need to add your initialization script, along with the Fluid library, to you HTML file. In the header of the file, link to the Javascript files with <script> tags:
<script type="text/javascript" src="infusion-1.2/InfusionAll.js"></script>
<script type="text/javascript" src="search-results.js"></script>
NOTE that the InfusionAll.js file is minified - all of the whitespace has been removed, so it isn't really human-readable. If you're using the source distribution and you want to be able to debug the code, you'll want to include each of the required files individually. This would look like this:
<script type="text/javascript" src="infusion-1.2/lib/jquery/core/js/jquery.js"></script>
<script type="text/javascript" src="infusion-1.2/lib/jquery/ui/js/ui.core.js"></script>
<script type="text/javascript" src="infusion-1.2/framework/core/js/jquery.keyboard-a11y.js"></script>
<script type="text/javascript" src="infusion-1.2/framework/core/js/Fluid.js"></script>
<script type="text/javascript" src="infusion-1.2/framework/core/js/DataBinding.js"></script>
<script type="text/javascript" src="infusion-1.2/components/pager/js/Pager.js"></script>
<script type="text/javascript" src="search-results.js"></script>
But all of these individual files are not necessary to make it work - the InfusionAll.js file has everything you need.
Step 4: Apply styles
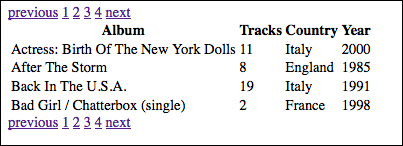
Unless you've added styles to your mark-up, you will see in a browser that it doesn't actually look like the example shown up in Step 1, but rather like the image on the right.
In addition to the general lack of prettiness, there's no styling to indicate what the current page is, for one. Also, when you're on the first or last link, the 'previous' or 'next' link (usually) should be disabled. (See the Pagination Design Pattern for more info on this.)
The Pager automatically adds CSS classes to elements in your mark-up at these 'interesting moments.' This provides you the opportunity to create styles for how you want the UI to change at these time.
There are two main classes that you will want to create styles for:
Style: "fl-pager-currentPage"
What: the page link that was just activated, and is currently being displayed
Why: so that users tell which page they're looking at
Sample style:
.fl-pager-currentPage {
    color: #000000;
    border: 0;
    text-decoration: none;
    cursor: default;
}
Style: "fl-pager-disabled"
What: the 'previous' and 'next' links when on the first and last page respectively
Why: so that users aren't tempted to try to go past the end of the list
Sample style:
.fl-pager-disabled {
    color: #777777;
    border: 0;
    text-decoration: none;
    cursor: default;
}
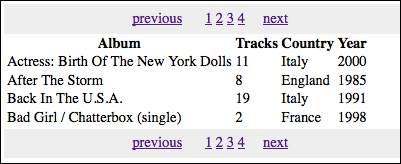
If we add a stylesheet with these styles, then when looking at the first page of search results, the page links will look like this: