The rest of this tutorial will explain each of these steps in detail. Step 1: Prepare your pageThe UI Options component includes templates for its user interface, so you do not need to actually create any HTML if you're happy with the defaults. For the full-page (with preview) version of UI Options, all you need to do is create an HTML page that has: - one identifiable
<div> where the UI Options markup will be inserted - a
<div> where the Table of Contents will be displayed (UI Options allows users to request a table of contents be displayed on each page; see the UI Enhancer tutorial for more information about this).
You might also choose to add a heading to the page. This all might look as shown below: | Code Block |
|---|
| <body>
<!-- This div should be placed where the Table of Contents is to be displayed -->
<div class="flc-toc-tocContainer"> </div>
<h1>Customize Your Presentation Settings</h1>
<!-- This is the div that will contain the UI Options component -->
<div id="myUIOptions"> </div>
</body>
|
Note that we've put an ID on the <div>. This ID will be used to tell UI Options exactly which element to use as the main container for all of its markup. You can use any kind of CSS-based selector (e.g. a classname), so long as you are sure it will uniquely identify one and only one element. If you open this page in your browser, you'll only see the header, since UI Options isn't present on the page yet: 
Step 2: Add dependencies to the page| Include Page |
|---|
| _UIO tutorials adding dependencies 1 | nopanel | true |
|---|
| _UIO tutorials adding dependencies 1 |
|---|
| nopanel | true |
|---|
|
You'll also need the UI Options CSS files specific to the Full Page UI Options with the Preview: | Code Block |
|---|
| <link rel="stylesheet" type="text/css" href="components/uiOptions/css/UIOptions.css" />
<link rel="stylesheet" type="text/css" href="components/uiOptions/css/FullUIOptions.css" />
<link rel="stylesheet" type="text/css" href="components/uiOptions/css/FullPreviewUIOptions.css" />
|
| Include Page |
|---|
| _UIO tutorials adding dependencies 2 | nopanel | true |
|---|
| _UIO tutorials adding dependencies 2 |
|---|
| nopanel | true |
|---|
|
Step 3: Write a script to create the UI Options component| Include Page |
|---|
| _UIO tutorials script 1 enhancer | nopanel | true |
|---|
| _UIO tutorials script 1 enhancer |
|---|
| nopanel | true |
|---|
|
| Include Page |
|---|
| _UIO tutorials script 2 uioptions | nopanel | true |
|---|
| _UIO tutorials script 2 uioptions |
|---|
| nopanel | true |
|---|
|
We will use the options to tell the component about two things: - where it's living in relation to the HTML templates included in Infusion: the
prefix option - where to redirect when the Cancel button is pressed: an
onCancel listener in the uiOptions subcomponent
| Code Block |
|---|
| <script type="text/javascript">
// Instantiate the UI Enhancer component, specifying the table of contents' template URL
fluid.pageEnhancer({
tocTemplate: "<path to your copy of Infusion>/components/tableOfContents/html/TableOfContents.html"
});
// Instantiate the UI Options component
fluid.uiOptions.fullPreview("#myUIOptions", {
// Tell UIOptions where to find all the templates, relative to this file
prefix: "<path to your copy of Infusion>/components/uiOptions/html/",
// Tell UIOptions where to redirect to if the user cancels the operation
uiOptions: {
options: {
listeners: {
onCancel: function(){
window.location = "<the URL of the page to return to>";
}
}
}
}
});
</script>
|
Now, when you load your page in your browser, you will see the UI Options controls, but there will be no Preview yet. UI Options will work: If you adjust the controls and click "Save and Apply," your changes will be applied to the page. There's just no Preview. 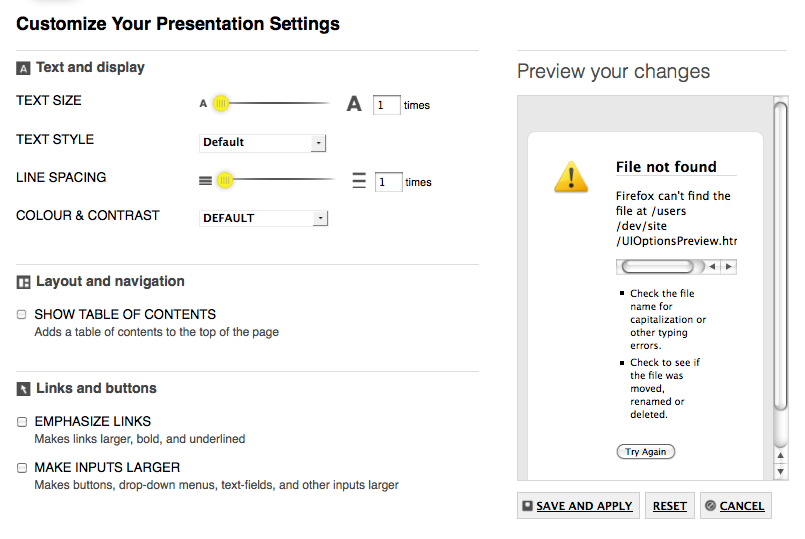
Step 4: Prepare the Preview templateUI Options does not come with a default Preview template – you must provide your own. Your users will be best served if the preview looks somewhat like your site. The simplest way to use the Preview is through UI Options' default behaviour. Name your Preview template file as follows: UIOptionPreview.html
and place it in the same folder as your main UI Options HTML file. If you follow this convention, UI Options will automatically find your Preview template. The Preview template file will be loaded into an <iframe>, so it must be a fully valid HTML file, with a header that includes any require CSS, etc. It will be displayed in the right half of the screen, so you may wish to design something that is not overly complex. Your preview should be styled the same was as your site, using the same theme (see the UI Enhancer tutorial for more information). Other than that, your preview can contain whatever you like. Enhancing the PreviewA UI Enhancer will automatically be applied to the page in the preview <iframe>, so as described in the UI Enhancer tutorial, you need to tell that Enhancer about the theme name and the path to the Table of Contents template: | Code Block |
|---|
| <script type="text/javascript">
// Instantiate the UI Enhancer component, specifying the table of contents' template URL
fluid.pageEnhancer({
tocTemplate: "<path to your copy of Infusion>/components/tableOfContents/html/TableOfContents.html"
});
// Instantiate the UI Options component
fluid.uiOptions.fullPreview("#myUIOptions", {
// Tell UIOptions where to find all the templates, relative to this file
prefix: "<path to your copy of Infusion>/components/uiOptions/html/",
// Tell UIOptions where to redirect to if the user cancels the operation
uiOptions: {
options: {
listeners: {
onCancel: function(){
window.location = "<the URL of the page to return to>";
}
}
}
},
previewEnhancer: {
options: {
// Tell the Preview's UI Enhancer where the Table of Contents template is
tocTemplate: "../../../components/tableOfContents/html/TableOfContents.html",
// and the name of the default theme
classnameMap: {
theme: {
"default": "uio-demo-theme"
}
}
}
},
});
</script>
|
Now when you load the page, you'll see your Preview template visible in the right half of the screen: 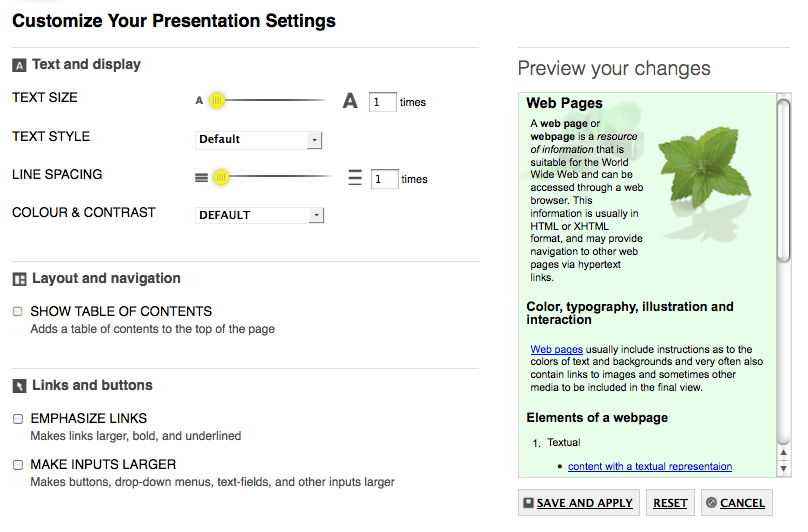
| Panel |
|---|
| Congratulations!
UI Options is now fully functional on your page. As you adjust the controls, your changes will be applied to the Preview. When you click "Save and Apply," your changes will be applied to the page. |
One last thing!Don't forget to add a link to the the UI Options page to your site – somewhere easy-to-find, such as your site's header or footer. |